
For Windows users, getting access to a Linux-based Nextflow development and runtime environment used to be hard. Users would need to run virtual machines, access separate physical servers or cloud instances, or install packages such as Cygwin or Wubi. Fortunately, there is now an easier way to deploy a complete Nextflow development environment on Windows.
The Windows Subsystem for Linux (WSL) allows users to build, manage and execute Nextflow pipelines on a Windows 10 laptop or desktop without needing a separate Linux machine or cloud VM. Users can build and test Nextflow pipelines and containerized workflows locally, on an HPC cluster, or their preferred cloud service, including AWS Batch and Azure Batch.
This document provides a step-by-step guide to setting up a Nextflow development environment on Windows 10.
The steps described in this guide are as follows:
PowerShell is a cross-platform command-line shell and scripting language available for Windows, Linux, and macOS. If you are an experienced Windows user, you are probably already familiar with PowerShell. PowerShell is worth taking a few minutes to download and install.
PowerShell is a big improvement over the Command Prompt in Windows 10. It brings features to Windows that Linux/UNIX users have come to expect, such as command-line history, tab completion, and pipeline functionality.
Make sure you are running Windows 10 Version 1903 with Build 18362 or higher. You can check your Windows version by select WIN-R (using the Windows key to run a command) and running the utility winver.
From within PowerShell, run the Windows Deployment Image and Service Manager (DISM) tool as an administrator to enable the Windows Subsystem for Linux. To run PowerShell with administrator privileges, right-click on the PowerShell icon from the Start menu or desktop and select “Run as administrator”.
PS C:\WINDOWS\System32> dism.exe /online /enable-feature /featurename:Microsoft-Windows-Subsystem-Linux /all /norestart
Deployment Image Servicing and Management tool
Version: 10.0.19041.844
Image Version: 10.0.19041.1083

Enabling feature(s)
[==========================100.0%==========================]
The operation completed successfully.
You can learn more about DISM here.
Within PowerShell, enable Virtual Machine Platform support using DISM. If you have trouble enabling this feature, make sure that virtual machine support is enabled in your machine’s BIOS.
PS C:\WINDOWS\System32> dism.exe /online /enable-feature /featurename:VirtualMachinePlatform /all /norestart
Deployment Image Servicing and Management tool
Version: 10.0.19041.844
Image Version: 10.0.19041.1083
Enabling feature(s)
[==========================100.0%==========================]
The operation completed successfully.
After enabling the Virtual Machine Platform support, restart your machine.
Nextflow users will want to take advantage of the latest features in WSL 2. You can learn about differences between WSL 1 and WSL 2 here. Before you can enable support for WSL 2, you’ll need to download the kernel update package at the link below:
WSL2 Linux kernel update package for x64 machines
Once downloaded, double click on the kernel update package and select “Yes” to install it with elevated permissions.
From within PowerShell:
PS C:\WINDOWS\System32> wsl --set-default-version 2
For information on key differences with WSL 2 please visit https://aka.ms/wsl2
If you run into difficulties with any of these steps, Microsoft provides detailed installation instructions here.
If you normally install Linux on VM environments such as VirtualBox or VMware, this probably sounds like a lot of work. Fortunately, Microsoft provides Linux OS distributions via the Microsoft Store that work with the Windows Subsystem for Linux.
Use this link to access and download a Linux Distribution for WSL through the Microsoft Store - https://aka.ms/wslstore.
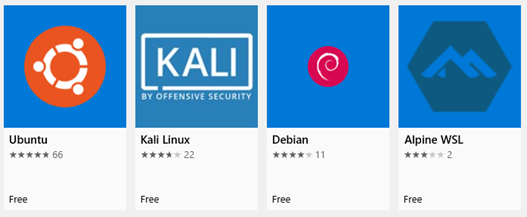
We selected the Ubuntu 20.04 LTS release. You can use a different distribution if you choose. Installation from the Microsoft Store is automated. Once the Linux distribution is installed, you can run a shell on Ubuntu (or your installed OS) from the Windows Start menu.
When you start Ubuntu Linux for the first time, you will be prompted to provide a UNIX username and password. The username that you select can be distinct from your Windows username. The UNIX user that you create will automatically have sudo privileges. Whenever a shell is started, it will default to this user.
After setting your username and password, update your packages on Ubuntu from the Linux shell using the following command:
sudo apt update && sudo apt upgrade
This is also a good time to add any additional Linux packages that you will want to use.
sudo apt install net-tools
While not necessary, it is a good idea to install Windows Terminal at this point. When working with Nextflow, it is handy to interact with multiple command lines at the same time. For example, users may want to execute flows, monitor logfiles, and run Docker commands in separate windows.
Windows Terminal provides an X-Windows-like experience on Windows. It helps organize your various command-line environments - Linux shell, Windows Command Prompt, PowerShell, AWS or Azure CLIs.
Instructions for downloading and installing Windows Terminal are available at: https://docs.microsoft.com/en-us/windows/terminal/get-started.
It is worth spending a few minutes getting familiar with available commands and shortcuts in Windows Terminal. Documentation is available at https://docs.microsoft.com/en-us/windows/terminal/command-line-arguments.
Some Windows Terminal commands you’ll need right away are provided below:
<arrow keys>There are two ways to install Docker for use with the WSL on Windows. One method is to install Docker directly on a hosted WSL Linux instance (Ubuntu in our case) and have the docker daemon run on the Linux kernel as usual. An installation recipe for people that choose this “native Linux” approach is provided here.
A second method is to run Docker Desktop on Windows. While Docker is more commonly used in Linux environments, it can be used with Windows also. The Docker Desktop supports containers running on Windows and Linux instances running under WSL. Docker Desktop provides some advantages for Windows users:
An explanation of how the Docker Desktop WSL 2 Back-end works is provided here.
Download and install Docker Desktop for Windows from the following link: https://desktop.docker.com/win/stable/amd64/Docker%20Desktop%20Installer.exe
Follow the on-screen prompts provided by the Docker Desktop Installer. The installation process will install Docker on Windows and install the Docker back-end components so that Docker commands are accessible from within WSL.
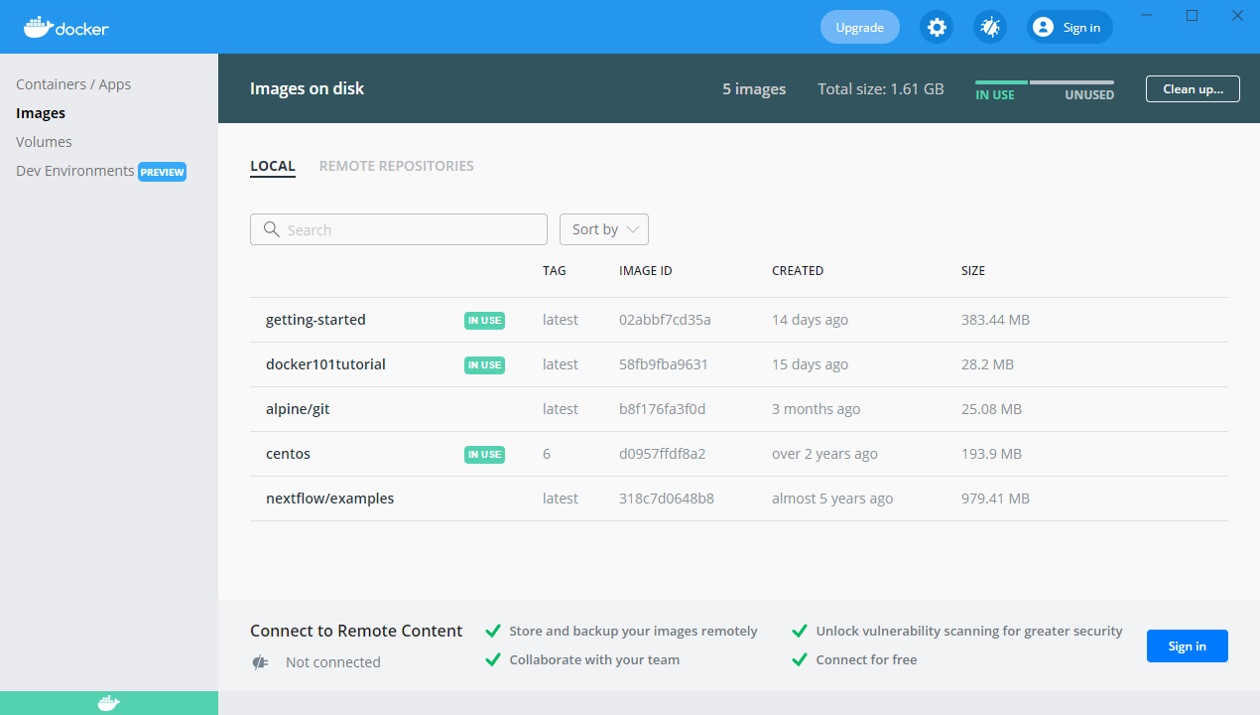
After installation, Docker Desktop can be run from the Windows start menu. The Docker Desktop user interface is shown below. Note that Docker containers launched under WSL can be managed from the Windows Docker Desktop GUI or Linux command line.
The installation process is straightforward, but if you run into difficulties, detailed instructions are available here.
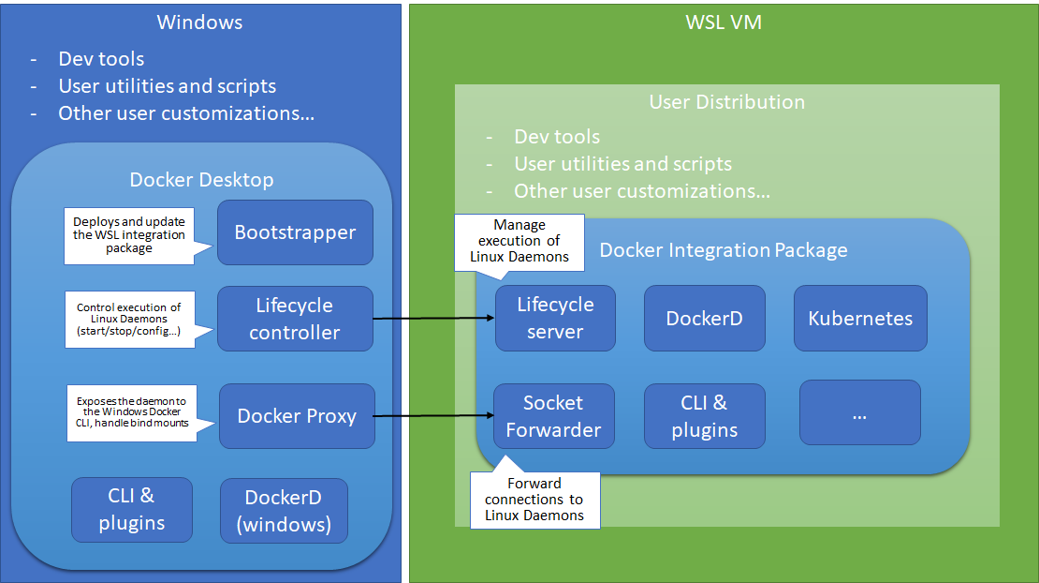
The Docker Engineering team provides an architecture diagram explaining how Docker on Windows interacts with WSL. Additional details are available here.
Now that Docker is installed, run a Docker container to verify that Docker and the Docker Integration Package on WSL 2 are working properly.
Run a Docker command from the Linux shell as shown below below. This command downloads a centos image from Docker Hub and allows us to interact with the container via an assigned pseudo-tty. Your Docker container may exit with exit code 139 when you run this and other Docker containers. If so, don’t worry – an easy fix to this issue is provided shortly.
$ docker run -ti centos:6
[root@02ac0beb2d2c /]# hostname
02ac0beb2d2c
You can run Docker commands in other Linux shell windows via the Windows Terminal environment to monitor and manage Docker containers and images. For example, running docker ps in another window shows the running CentOS Docker container.
$ docker ps
CONTAINER ID IMAGE   COMMAND   CREATED    STATUS    NAMES
f5dad42617f1 centos:6 "/bin/bash" 2 minutes ago Up 2 minutes 	happy_hopper
You may encounter exit code 139 when running Docker containers. This is a known problem when running containers with specific base images within Docker Desktop. Good explanations of the problem and solution are provided here and here.
The solution is to add two lines to a .wslconfig file in your Windows home directory. The .wslconfig file specifies kernel options that apply to all Linux distributions running under WSL 2.
Some of the Nextflow container images served from Docker Hub are affected by this bug since they have older base images, so it is a good idea to apply this fix.
Edit the .wslconfig file in your Windows home directory. You can do this using PowerShell as shown:
PS C:\Users\<username> notepad .wslconfig
Add these two lines to the .wslconfig file and save it:
[wsl2]
kernelCommandLine = vsyscall=emulate
After this, restart your machine to force a restart of the Docker and WSL 2 environment. After making this correction, you should be able to launch containers without seeing exit code 139.
Developers can choose from a variety of IDEs depending on their preferences. Some examples of IDEs and developer-friendly editors are below:
We decided to install Visual Studio Code because it has some nice features, including:
Download Visual Studio Code from https://code.visualstudio.com/Download and follow the installation procedure. The installation process will detect that you are running WSL. You will be invited to download and install the Remote WSL extension.
\\wsl$\<linux-environment>. In our example, the path from Windows to access files from the root of our Ubuntu Linux instance is: \wsl$\Ubuntu-20.04.Note that the reverse is possible also – from within Linux, /mnt/c maps to the Windows C: drive. You can inspect /etc/mtab to see the mounted file systems available under Linux.
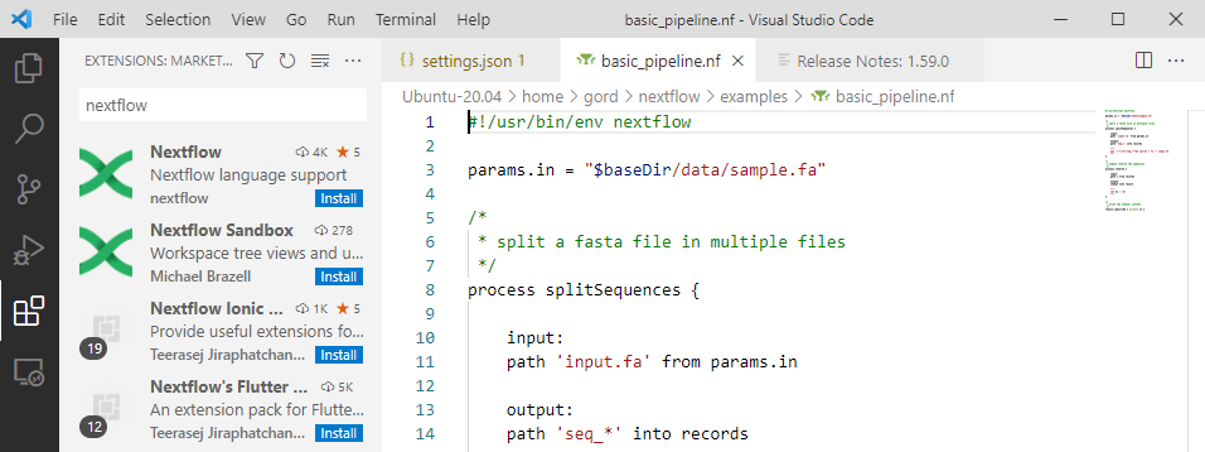
It is a good idea to install Nextflow language support in VS Code. You can do this by selecting the Extensions icon from the left panel of the VS Code interface and searching the extensions library for Nextflow as shown. The Nextflow language support extension is on GitHub at https://github.com/nextflow-io/vscode-language-nextflow
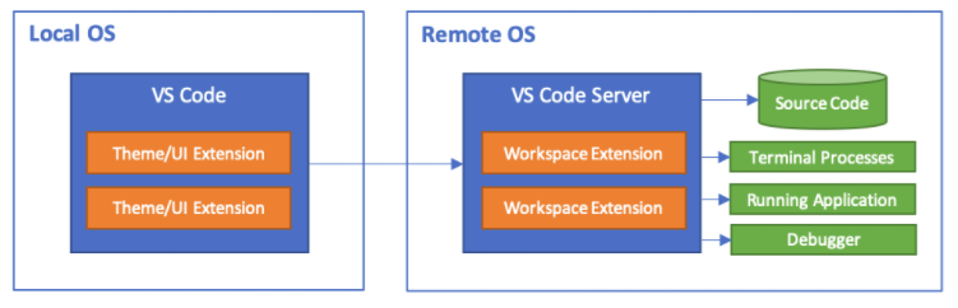
Visual Studio Code Remote Development supports development on remote environments such as containers or remote hosts. For Nextflow users, it is important to realize that VS Code sees the Ubuntu instance we installed on WSL as a remote environment. The Diagram below illustrates how remote development works. From a VS Code perspective, the Linux instance in WSL is considered a remote environment.
Windows users work within VS Code in the Windows environment. However, source code, developer tools, and debuggers all run Linux on WSL, as illustrated below.
An explanation of how VS Code Remote Development works is provided here.
VS Code users see the Windows filesystem, plug-ins specific to VS Code on Windows, and access Windows versions of tools such as Git. If you prefer to develop in Linux, you will want to select WSL as the remote environment.
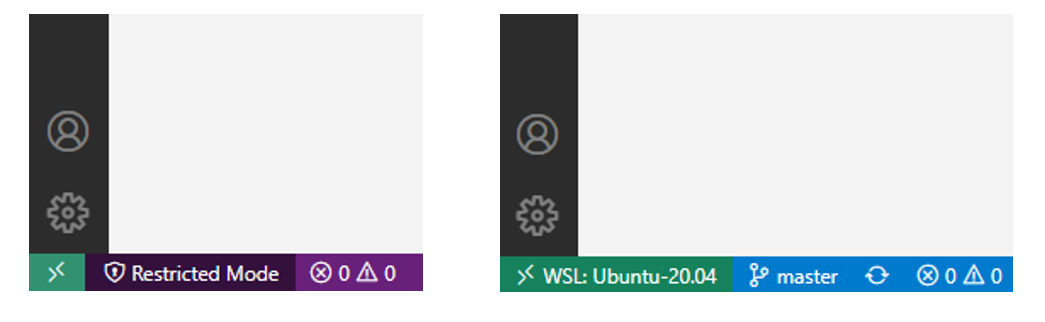
To open a new VS Code Window running in the context of the WSL Ubuntu-20.04 environment, click the green icon at the lower left of the VS Code window and select “New WSL Window using Distro ..” and select Ubuntu 20.04. You’ll notice that the environment changes to show that you are working in the WSL: Ubuntu-20.04 environment.
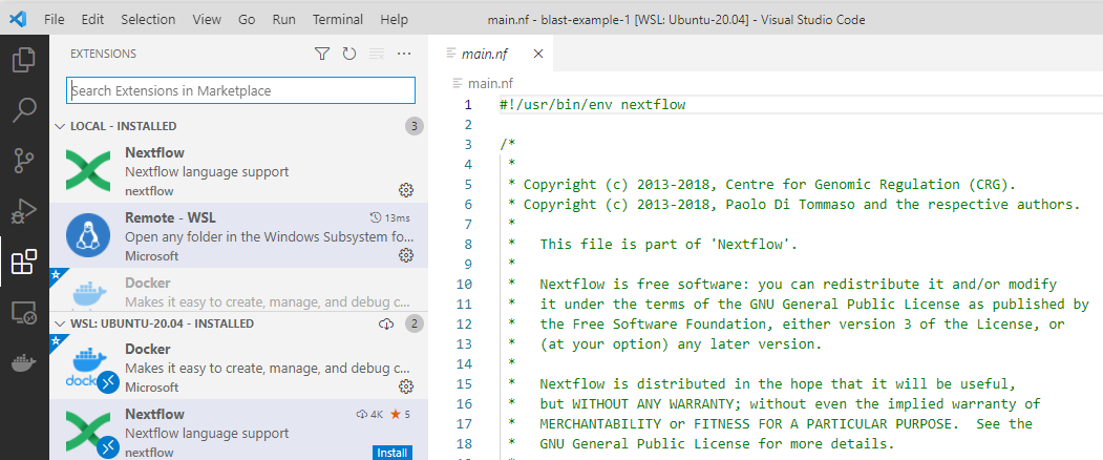
Selecting the Extensions icon, you can see that different VS Code Marketplace extensions run in different contexts. The Nextflow Language extension installed in the previous step is globally available. It works when developing on Windows or developing on WSL: Ubuntu-20.04.
The Extensions tab in VS Code differentiates between locally installed plug-ins and those installed under WSL.
With Linux, Docker, and an IDE installed, now we can install Nextflow in our WSL 2 hosted Linux environment. Detailed instructions for installing Nextflow are available at https://www.nextflow.io/docs/latest/getstarted.html#installation
Java is a prerequisite for running Nextflow. Instructions for installing Java on Ubuntu are available here. To install the default OpenJDK, follow the instructions below in a Linux shell window:
Update the apt package index:
sudo apt update
Install the latest default OpenJDK package
sudo apt install default-jdk
Verify the installation
java -version
curl is a convenient way to obtain Nextflow. curl is included in the default Ubuntu repositories, so installation is straightforward.
From the shell:
sudo apt update
sudo apt install curl
Verify that curl works:
$ curl
curl: try 'curl --help' or 'curl --manual' for more information
Use curl to retrieve Nextflow into a temporary directory and then install it in /usr/bin so that the Nextflow command is on your path:
mkdir temp
cd temp
curl -s https://get.nextflow.io | bash
sudo cp nextflow /usr/bin
Make sure that Nextflow is executable:
sudo chmod 755 /usr/bin/nextflow
or if you prefer:
sudo chmod +x /usr/bin/nextflow
Make sure Nextflow runs:
$ nextflow -version

  N E X T F L O W
  version 21.04.2 build 5558
  created 12-07-2021 07:54 UTC (03:54 EDT)
  cite doi:10.1038/nbt.3820
  http://nextflow.io
Run a simple Nextflow pipeline. The example below downloads and executes a sample hello world pipeline from GitHub - https://github.com/nextflow-io/hello.
$ nextflow run hello

N E X T F L O W ~ version 21.04.2
Launching `nextflow-io/hello` [distracted_pare] - revision: ec11eb0ec7 [master]
executor > local (4)
[06/c846d8] process > sayHello (3) [100%] 4 of 4 ✔
Ciao world!

Hola world!

Bonjour world!

Hello world!
To validate that Nextflow works with containerized workflows, we can run a slightly more complicated example. A sample workflow involving NCBI Blast is available at https://github.com/nextflow-io/blast-example. Rather than installing Blast on our local Linux instance, it is much easier to pull a container preloaded with Blast and other software that the pipeline depends on.
The nextflow.config file for the Blast example (below) specifies that process logic is encapsulated in the container nextflow/examples available from Docker Hub (https://hub.docker.com/r/nextflow/examples).
On GitHub: nextflow-io/blast-example/nextflow.config
manifest {
  nextflowVersion = '>= 20.01.0'
}

process {
  container = 'nextflow/examples'
}
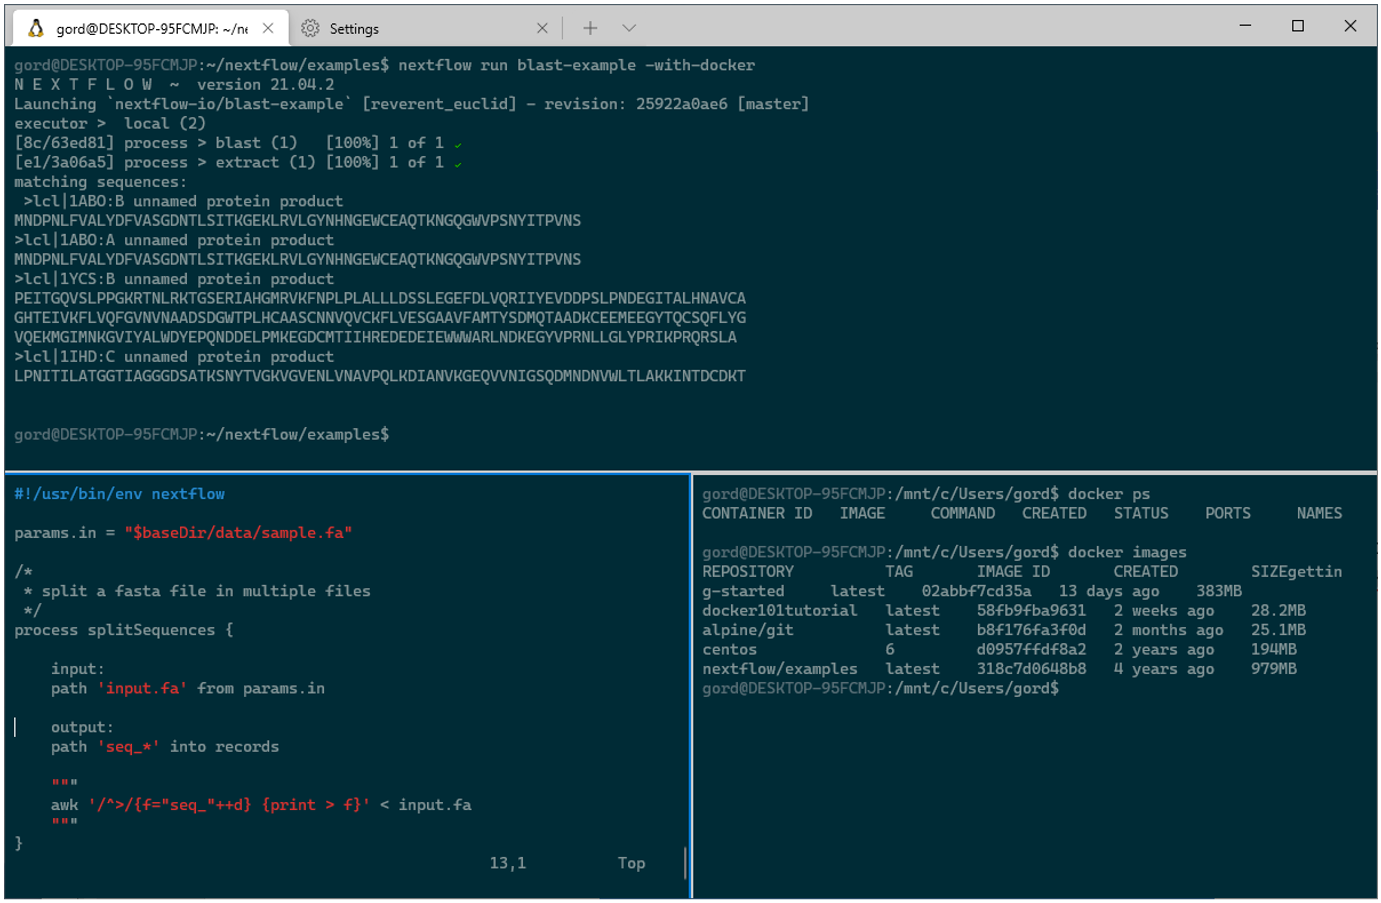
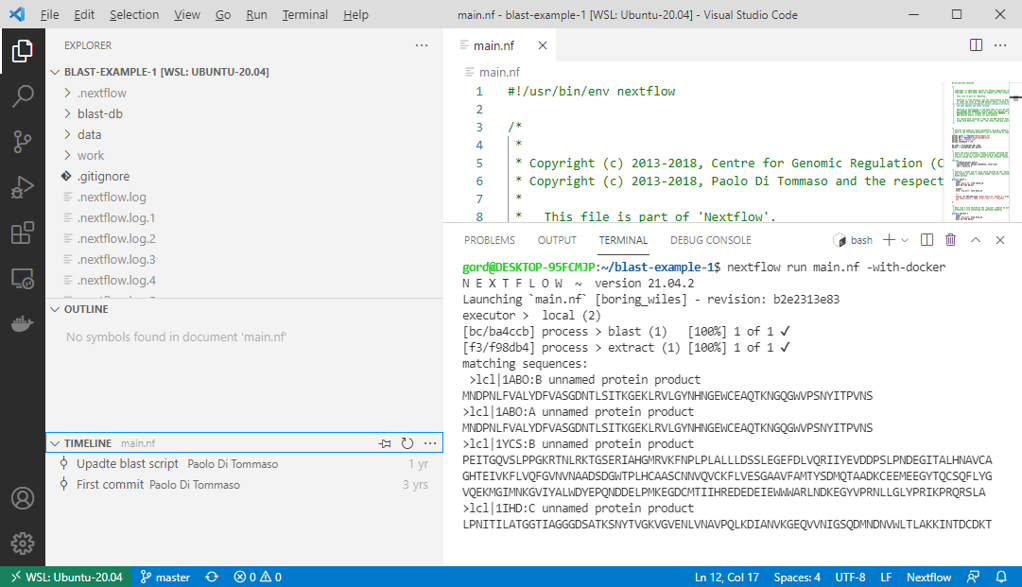
Run the blast-example pipeline that resides on GitHub directly from WSL and specify Docker as the container runtime using the command below:
$ nextflow run blast-example -with-docker
N E X T F L O W ~ version 21.04.2
Launching `nextflow-io/blast-example` [sharp_raman] - revision: 25922a0ae6 [master]
executor > local (2)
[aa/a9f056] process > blast (1)  [100%] 1 of 1 ✔
[b3/c41401] process > extract (1) [100%] 1 of 1 ✔
matching sequences:
>lcl|1ABO:B unnamed protein product
MNDPNLFVALYDFVASGDNTLSITKGEKLRVLGYNHNGEWCEAQTKNGQGWVPSNYITPVNS
>lcl|1ABO:A unnamed protein product
MNDPNLFVALYDFVASGDNTLSITKGEKLRVLGYNHNGEWCEAQTKNGQGWVPSNYITPVNS
>lcl|1YCS:B unnamed protein product
PEITGQVSLPPGKRTNLRKTGSERIAHGMRVKFNPLPLALLLDSSLEGEFDLVQRIIYEVDDPSLPNDEGITALHNAVCA
GHTEIVKFLVQFGVNVNAADSDGWTPLHCAASCNNVQVCKFLVESGAAVFAMTYSDMQTAADKCEEMEEGYTQCSQFLYG
VQEKMGIMNKGVIYALWDYEPQNDDELPMKEGDCMTIIHREDEDEIEWWWARLNDKEGYVPRNLLGLYPRIKPRQRSLA
>lcl|1IHD:C unnamed protein product
LPNITILATGGTIAGGGDSATKSNYTVGKVGVENLVNAVPQLKDIANVKGEQVVNIGSQDMNDNVWLTLAKKINTDCDKT
Nextflow executes the pipeline directly from the GitHub repository and automatically pulls the nextflow/examples container from Docker Hub if the image is unavailable locally. The pipeline then executes the two containerized workflow steps (blast and extract). The pipeline then collects the sequences into a single file and prints the result file content when pipeline execution completes.
Pipeline developers will probably want to use the Nextflow Console at some point. The Nextflow Console’s REPL (read-eval-print loop) environment allows developers to quickly test parts of scripts or Nextflow code segments interactively.
The Nextflow Console is launched from the Linux command line. However, the Groovy-based interface requires an X-Windows environment to run. You can set up X-Windows with WSL using the procedure below. A good article on this same topic is provided here.
Download an X-Windows server for Windows. In this example, we use the VcXsrv Windows X Server available from source forge at https://sourceforge.net/projects/vcxsrv/.
Accept all the defaults when running the automated installer. The X-server will end up installed in c:\Program Files\VcXsrv.
The automated installation of VcXsrv will create an “XLaunch” shortcut on your desktop. It is a good idea to create your own shortcut with a customized command line so that you don’t need to interact with the XLaunch interface every time you start the X-server.
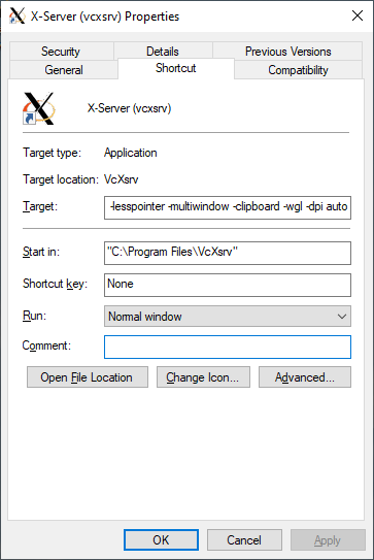
Right-click on the Windows desktop to create a new shortcut, give it a meaningful name, and insert the following for the shortcut target:
"C:\Program Files\VcXsrv\vcxsrv.exe" :0 -ac -terminate -lesspointer -multiwindow -clipboard -wgl -dpi auto
Inspecting the new shortcut properties, it should look something like this:
Double-click on the new shortcut desktop icon to test it. Unfortunately, the X-server runs in the background. When running the X-server in multiwindow mode (which we recommend), it is not obvious whether the X-server is running.
One way to check that the X-server is running is to use the Microsoft Task Manager and look for the XcSrv process running in the background. You can also verify it is running by using the netstat command from with PowerShell on Windows to ensure that the X-server is up and listening on the appropriate ports. Using netstat, you should see output like the following:
PS C:\WINDOWS\system32> **netstat -abno | findstr 6000**
 TCP  0.0.0.0:6000      0.0.0.0:0       LISTENING    35176
 TCP  127.0.0.1:6000     127.0.0.1:56516    ESTABLISHED   35176
 TCP  127.0.0.1:6000     127.0.0.1:56517    ESTABLISHED   35176
 TCP  127.0.0.1:6000     127.0.0.1:56518    ESTABLISHED   35176
 TCP  127.0.0.1:56516    127.0.0.1:6000     ESTABLISHED   35176
 TCP  127.0.0.1:56517    127.0.0.1:6000     ESTABLISHED   35176
 TCP  127.0.0.1:56518    127.0.0.1:6000     ESTABLISHED   35176
 TCP  172.28.192.1:6000   172.28.197.205:46290  TIME_WAIT    0
 TCP  [::]:6000       [::]:0         LISTENING    35176
At this point, the X-server is up and running and awaiting a connection from a client.
Within Ubuntu in WSL, we need to set up the environment to communicate with the X-Windows server. The shell variable DISPLAY needs to be set pointing to the IP address of the X-server and the instance of the X-windows server.
The shell script below will set the DISPLAY variable appropriately and export it to be available to X-Windows client applications launched from the shell. This scripting trick works because WSL sees the Windows host as the nameserver and this is the same IP address that is running the X-Server. You can echo the $DISPLAY variable after setting it to verify that it is set correctly.
$ export DISPLAY=$(cat /etc/resolv.conf | grep nameserver | awk '{print $2}'):0.0
$ echo $DISPLAY
172.28.192.1:0.0
Add this command to the end of your .bashrc file in the Linux home directory to avoid needing to set the DISPLAY variable every time you open a new window. This way, if the IP address of the desktop or laptop changes, the DISPLAY variable will be updated accordingly.
cd ~
vi .bashrc
# set the X-Windows display to connect to VcXsrv on Windows
export DISPLAY=$(cat /etc/resolv.conf | grep nameserver | awk '{print $2}'):0.0
".bashrc" 120L, 3912C written
Use an X-windows client to make sure that the X- server is working. Since X-windows clients are not installed by default, download an xterm client as follows via the Linux shell:
sudo apt install xterm
Assuming that the X-server is up and running on Windows, and the Linux DISPLAY variable is set correctly, you’re ready to test X-Windows.
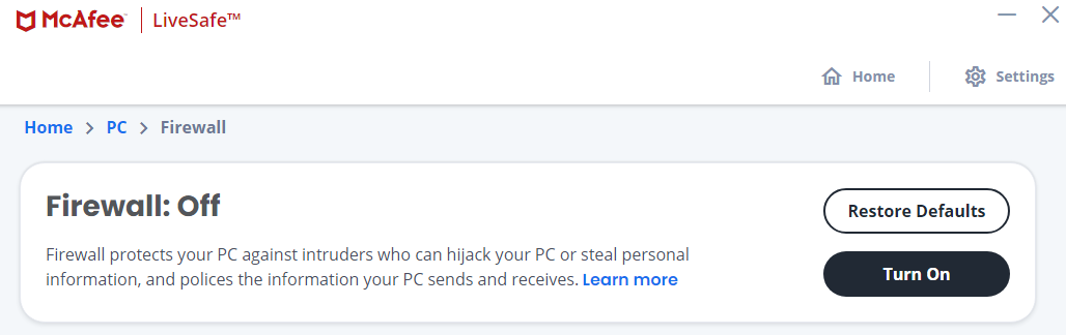
Before testing X-Windows, do yourself a favor and temporarily disable the Windows Firewall. The Windows Firewall will very likely block ports around 6000, preventing client requests on WSL from connecting to the X-server. You can find this under Firewall & network protection on Windows. Clicking the “Private Network” or “Public Network” options will show you the status of the Windows Firewall and indicate whether it is on or off.
Depending on your installation, you may be running a specific Firewall. In this example, we temporarily disable the McAfee LiveSafe Firewall as shown:
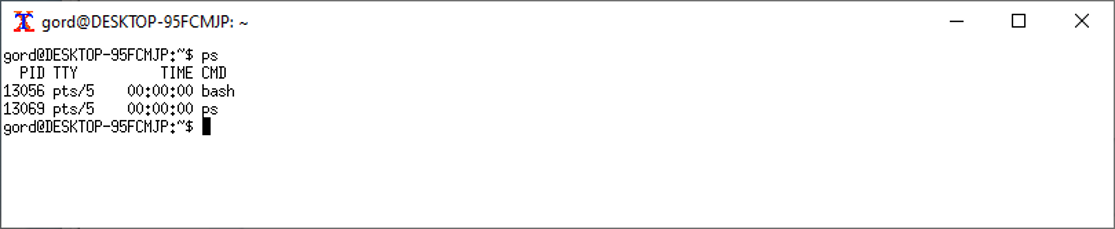
With the Firewall disabled, you can attempt to launch the xterm client from the Linux shell:
xterm &
If everything is working correctly, you should see the new xterm client appear under Windows. The xterm is executing on Ubuntu under WSL but displays alongside other Windows on the Windows desktop. This is what is meant by “multiwindow” mode.
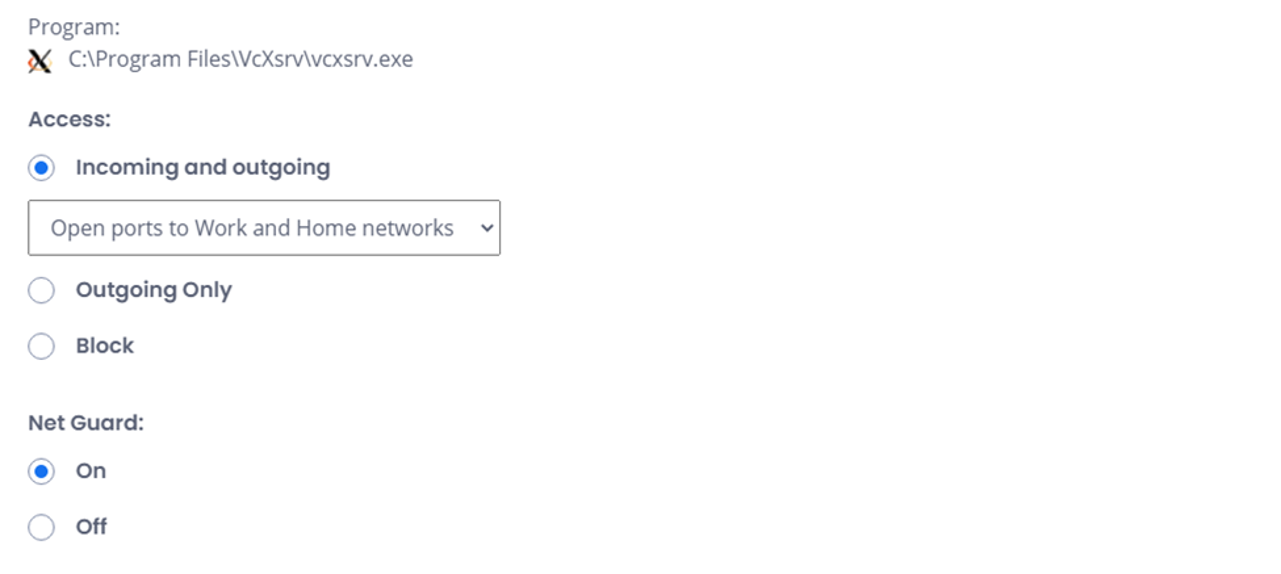
Now that you know X-Windows is working correctly turn the Firewall back on, and adjust the settings to allow traffic to and from the required port. Ideally, you want to open only the minimal set of ports and services required. In the case of the McAfee Firewall, getting X-Windows to work required changing access to incoming and outgoing ports to “Open ports to Work and Home networks” for the vcxsrv.exe program only as shown:
With the X-server running, the DISPLAY variable set, and the Windows Firewall configured correctly, we can now launch the Nextflow Console from the shell as shown:
nextflow console
The command above opens the Nextflow REPL console under X-Windows.
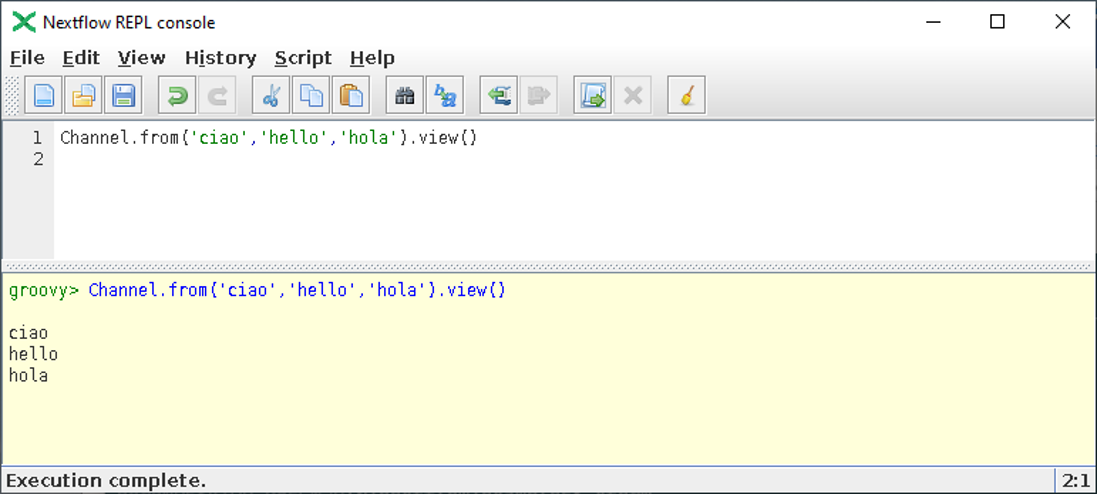
Inside the Nextflow console, you can enter Groovy code and run it interactively, a helpful feature when developing and debugging Nextflow pipelines.
Collaborative source code management systems such as BitBucket, GitHub, and GitLab are used to develop and share Nextflow pipelines. To be productive with Nextflow, you will want to install Git.
As explained earlier, VS Code operates in different contexts. When running VS Code in the context of Windows, VS Code will look for a local copy of Git. When using VS Code to operate against the remote WSL environment, a separate installation of Git installed on Ubuntu will be used. (Note that Git is installed by default on Ubuntu 20.04)
Developers will probably want to use Git both from within a Windows context and a Linux context, so we need to make sure that Git is present in both environments.
Download the install the 64-bit Windows version of Git from https://git-scm.com/downloads.
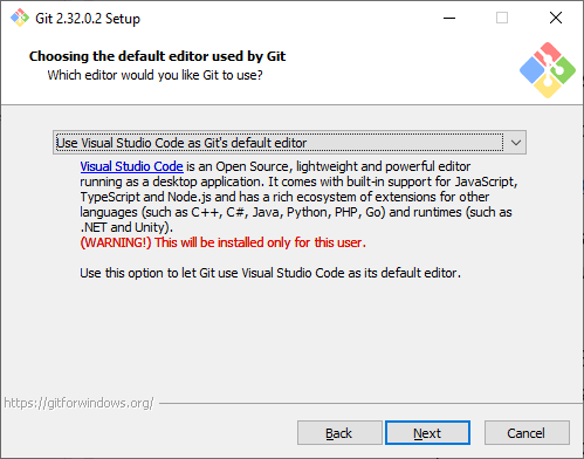
Click on the Git installer from the Downloads directory, and click through the default installation options. During the install process, you will be asked to select the default editor to be used with Git. (VIM, Notepad++, etc.). Select Visual Studio Code (assuming that this is the IDE that you plan to use for Nextflow).
The Git installer will prompt you for additional settings. If you are not sure, accept the defaults. When asked, adjust the PATH variable to use the recommended option, making the Git command line available from Git Bash, the Command Prompt, and PowerShell.
After installation Git Bash, Git GUI, and GIT CMD will appear as new entries under the Start menu. If you are running Git from PowerShell, you will need to open a new Windows to force PowerShell to reset the path variable. By default, Git installs in C:\Program Files\Git.
If you plan to use Git from the command line, GitHub provides a useful cheatsheet here.
After installing Git, from within VS Code (in the context of the local host), select the Source Control icon from the left pane of the VS Code interface as shown. You can open local folders that contain a git repository or clone repositories from GitHub or your preferred source code management system.
Documentation on using Git with Visual Studio Code is provided at https://code.visualstudio.com/docs/editor/versioncontrol
Open a Remote VS Code Window on *WSL: Ubuntu 20.04* (By selecting the green icon on the lower-left corner of the VS code interface.)
Git should already be installed in /usr/bin, but you can validate this from the Ubuntu shell:
$ git --version
git version 2.25.1
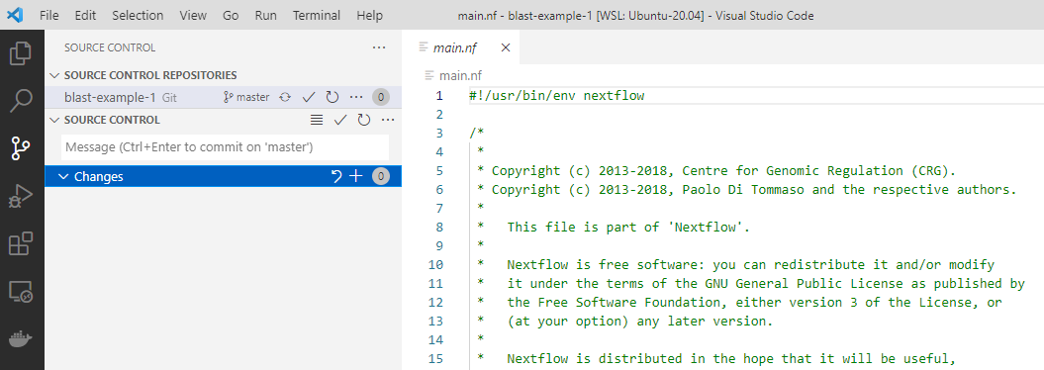
To get started using Git with VS Code Remote on WSL, select the Source Control icon on the left panel of VS code. Assuming VS Code Remote detects that Git is installed on Linux, you should be able to Clone a Repository.
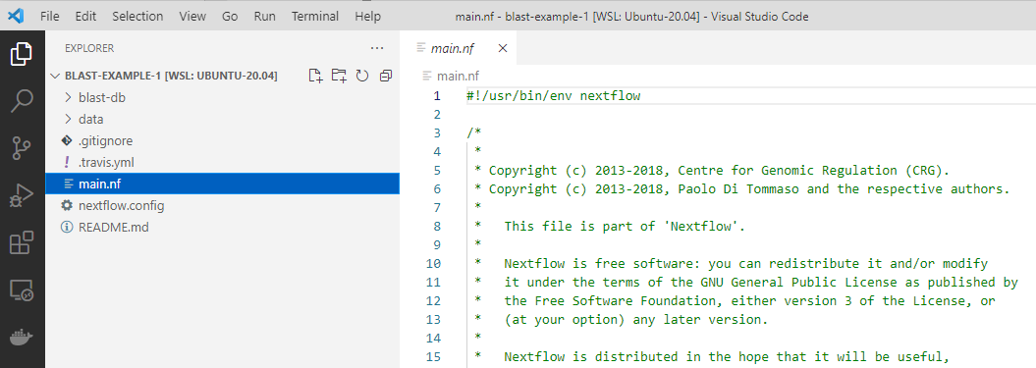
Select “Clone Repository,” and when prompted, clone the GitHub repo for the Blast example that we used earlier - https://github.com/nextflow-io/blast-example. Clone this repo into your home directory on Linux. You should see blast-example appear as a source code repository within VS code as shown:
Select the Explorer panel in VS Code to see the cloned blast-example repo. Now we can explore and modify the pipeline code using the IDE.
After making modifications to the pipeline, we can execute the local copy of the pipeline either from the Linux shell or directly via the Terminal window in VS Code as shown:
With the Docker VS Code extension, users can select the Docker icon from the left code to view containers and images associated with the Nextflow pipeline.
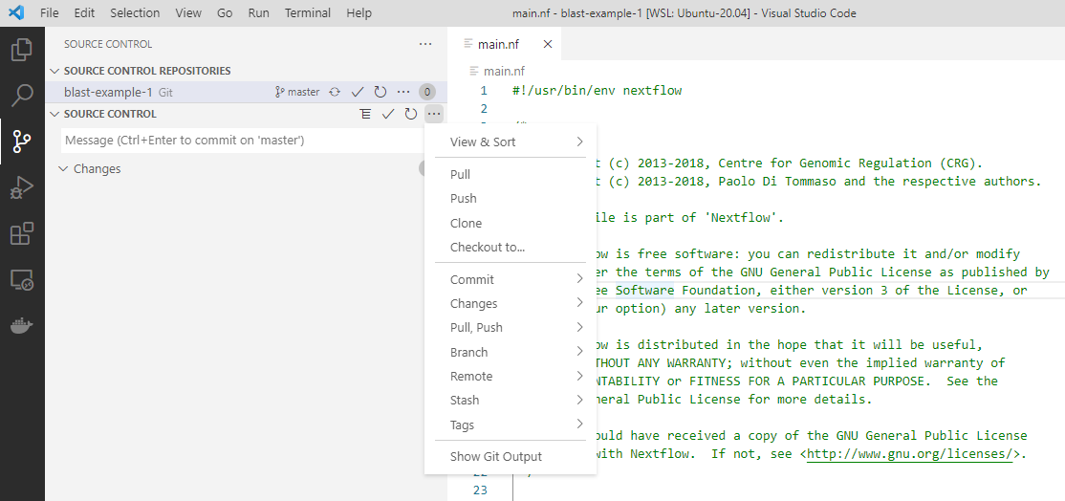
Git commands are available from within VS Code by selecting the Source Control icon on the left panel and selecting the three dots (…) to the right of SOURCE CONTROL. Some operations such as pushing or committing code will require that VS Code be authenticated with your GitHub credentials.
With WSL2, Windows 10 is an excellent environment for developing and testing Nextflow pipelines. Users can take advantage of the power and convenience of a Linux command line environment while using Windows-based IDEs such as VS-Code with full support for containers.
Pipelines developed in the Windows environment can easily be extended to compute environments in the cloud.
While installing Nextflow itself is straightforward, installing and testing necessary components such as WSL, Docker, an IDE, and Git can be a little tricky. Hopefully readers will find this guide helpful.