
We have talked about Google Cloud Batch before. Not only that, we were proud to announce Nextflow support to Google Cloud Batch right after it was publicly released, back in July 2022. How amazing is that? But we didn’t stop there! The Nextflow official documentation also provides a lot of useful information on how to use Google Cloud Batch as the compute environment for your Nextflow pipelines. Having said that, feedback from the community is valuable, and we agreed that in addition to the documentation, teaching by example, and in a more informal language, can help many of our users. So, here is a tutorial on how to use the Batch service of the Google Cloud Platform with Nextflow 🥳
Welcome to our RNAseq tutorial using Nextflow and Google Cloud Batch! RNAseq is a powerful technique for studying gene expression and is widely used in a variety of fields, including genomics, transcriptomics, and epigenomics. In this tutorial, we will show you how to use Nextflow, a popular workflow management tool, to run a proof-of-concept RNAseq pipeline to perform the analysis on Google Cloud Batch, a scalable cloud-based computing platform. For a real Nextflow RNAseq pipeline, check nf-core/rnaseq. For the proof-of-concept RNAseq pipeline that we will use here, check nextflow-io/rnaseq-nf.
Nextflow allows you to easily develop, execute, and scale complex pipelines on any infrastructure, including the cloud. Google Cloud Batch enables you to run batch workloads on Google Cloud Platform (GCP), with the ability to scale up or down as needed. Together, Nextflow and Google Cloud Batch provide a powerful and flexible solution for RNAseq analysis.
We will walk you through the entire process, from setting up your Google Cloud account and installing Nextflow to running an RNAseq pipeline and interpreting the results. By the end of this tutorial, you will have a solid understanding of how to use Nextflow and Google Cloud Batch for RNAseq analysis. So let’s get started!
In this tutorial, you will learn how to use the gcloud command-line interface to interact with the Google Cloud Platform and set up your Google Cloud account for use with Nextflow. If you do not already have gcloud installed, you can follow the instructions here to install it. Once you have gcloud installed, run the command gcloud init to initialize the CLI. You will be prompted to choose an existing project to work on or create a new one. For the purpose of this tutorial, we will create a new project. Name your project “my-rnaseq-pipeline”. There may be a lot of information displayed on the screen after running this command, but you can ignore it for now.
According to the official Google documentation Batch is a fully managed service that lets you schedule, queue, and execute batch processing workloads on Compute Engine virtual machine (VM) instances. Batch provisions resources and manages capacity on your behalf, allowing your batch workloads to run at scale.
The first step is to download the beta command group. You can do this by executing:
$ gcloud components install beta
Then, enable billing for this project. You will first need to get your account id with
$ gcloud beta billing accounts list
After that, you will see something like the following appear in your window:
ACCOUNT_ID            NAME                OPEN  MASTER_ACCOUNT_ID
XXXXX-YYYYYY-ZZZZZZ  My Billing Account  True
If you get the error “Service Usage API has not been used in project 842841895214 before or it is disabled”, simply run the command again and it should work. Then copy the account id, and the project id and paste them into the command below. This will enable billing for your project id.
$ gcloud beta billing projects link PROJECT-ID --billing-account XXXXXX-YYYYYY-ZZZZZZ
Next, you must enable the Batch API, along with the Compute Engine and Cloud Logging APIs. You can do so with the following command:
$ gcloud services enable batch.googleapis.com compute.googleapis.com logging.googleapis.com
You should see a message similar to the one below:
Operation "operations/acf.p2-AAAA-BBBBB-CCCC--DDDD" finished successfully.
In order to access the APIs we enabled, you need to create a Service Account and set the necessary IAM roles for the project. You can create the Service Account by executing:
$ gcloud iam service-accounts create rnaseq-pipeline-sa
After this, set appropriate roles for the project using the commands below:
$ gcloud projects add-iam-policy-binding my-rnaseq-pipeline \
--member="serviceAccount:rnaseq-pipeline-sa@my-rnaseq-pipeline.iam.gserviceaccount.com" \
--role="roles/iam.serviceAccountUser"

$ gcloud projects add-iam-policy-binding my-rnaseq-pipeline \
--member="serviceAccount:rnaseq-pipeline-sa@my-rnaseq-pipeline.iam.gserviceaccount.com" \
--role="roles/batch.jobsEditor"

$ gcloud projects add-iam-policy-binding my-rnaseq-pipeline \
--member="serviceAccount:rnaseq-pipeline-sa@my-rnaseq-pipeline.iam.gserviceaccount.com" \
--role="roles/logging.viewer"

$ gcloud projects add-iam-policy-binding my-rnaseq-pipeline \
--member="serviceAccount:rnaseq-pipeline-sa@my-rnaseq-pipeline.iam.gserviceaccount.com" \
--role="roles/storage.admin"
Now it’s time to create your Storage bucket, where both your input, intermediate and output files will be hosted and accessed by the Google Batch virtual machines. Your bucket name must be globally unique (across regions). For the example below, the bucket is named rnaseq-pipeline-nextflow-bucket. However, as this name has now been used you have to create a bucket with a different name
$ gcloud storage buckets create gs://rnaseq-pipeline-bckt
Now it’s time for Nextflow to join the party! 🥳
Here you will set up a simple RNAseq pipeline with Nextflow to be run entirely on Google Cloud Platform (GCP) directly from your local machine.
Start by creating a folder for your project on your local machine, such as “rnaseq-example”. It’s important to mention that you can also go fully cloud and use a Virtual Machine for everything we will do here locally.
Inside the folder that you created for the project, create a file named nextflow.config with the following content (remember to replace PROJECT-ID with the project id you created above):
workDir = 'gs://rnaseq-pipeline-bckt/scratch'

process {
  executor = 'google-batch'
  container = 'nextflow/rnaseq-nf'
  errorStrategy = { task.exitStatus==14 ? 'retry' : 'terminate' }
  maxRetries = 5
}

google {
  project = 'PROJECT-ID'
  location = 'us-central1'
  batch.spot = true
}
The workDir option tells Nextflow to use the bucket you created as the work directory. Nextflow will use this directory to stage our input data and store intermediate and final data. Nextflow does not allow you to use the root directory of a bucket as the work directory — it must be a subdirectory instead. Using a subdirectory is also just a good practice.
The process scope tells Nextflow to run all the processes (steps) of your pipeline on Google Batch and to use the nextflow/rnaseq-nf Docker image hosted on DockerHub (default) for all processes. Also, the error strategy will automatically retry any failed tasks with exit code 14, which is the exit code for spot instances that were reclaimed.
The google scope is specific to Google Cloud. You need to provide the project id (don’t provide the project name, it won’t work!), and a Google Cloud location (leave it as above if you’re not sure of what to put). In the example above, spot instances are also requested (more info about spot instances here), which are cheaper instances that, as a drawback, can be reclaimed at any time if resources are needed by the cloud provider. Based on what we have seen so far, the nextflow.config file should contain “rnaseq-nxf” as the project id.
Use the command below to authenticate with Google Cloud Platform. Nextflow will use this account by default when you run a pipeline.
$ gcloud auth application-default login
With that done, you’re now ready to run the proof-of-concept RNAseq Nextflow pipeline. Instead of asking you to download it, or copy-paste something into a script file, you can simply provide the GitHub URL of the RNAseq pipeline mentioned at the beginning of this tutorial, and Nextflow will do all the heavy lifting for you. This pipeline comes with test data bundled with it, and for more information about it and how it was developed, you can check the public training material developed by Seqera Labs at https://training.nextflow.io/.
One important thing to mention is that in this repository there is already a nextflow.config file with different configuration, but don’t worry about that. You can run the pipeline with the configuration file that we have wrote above using the -c Nextflow parameter. Run the command line below:
$ nextflow run nextflow-io/rnaseq-nf -c nextflow.config
While the pipeline stores everything in the bucket, our example pipeline will also download the final outputs to a local directory called results, because of how the publishDir directive was specified in the main.nf script (example here). If you want to avoid the egress cost associated with downloading data from a bucket, you can change the publishDir to another bucket directory, e.g. gs://rnaseq-pipeline-bckt/results.
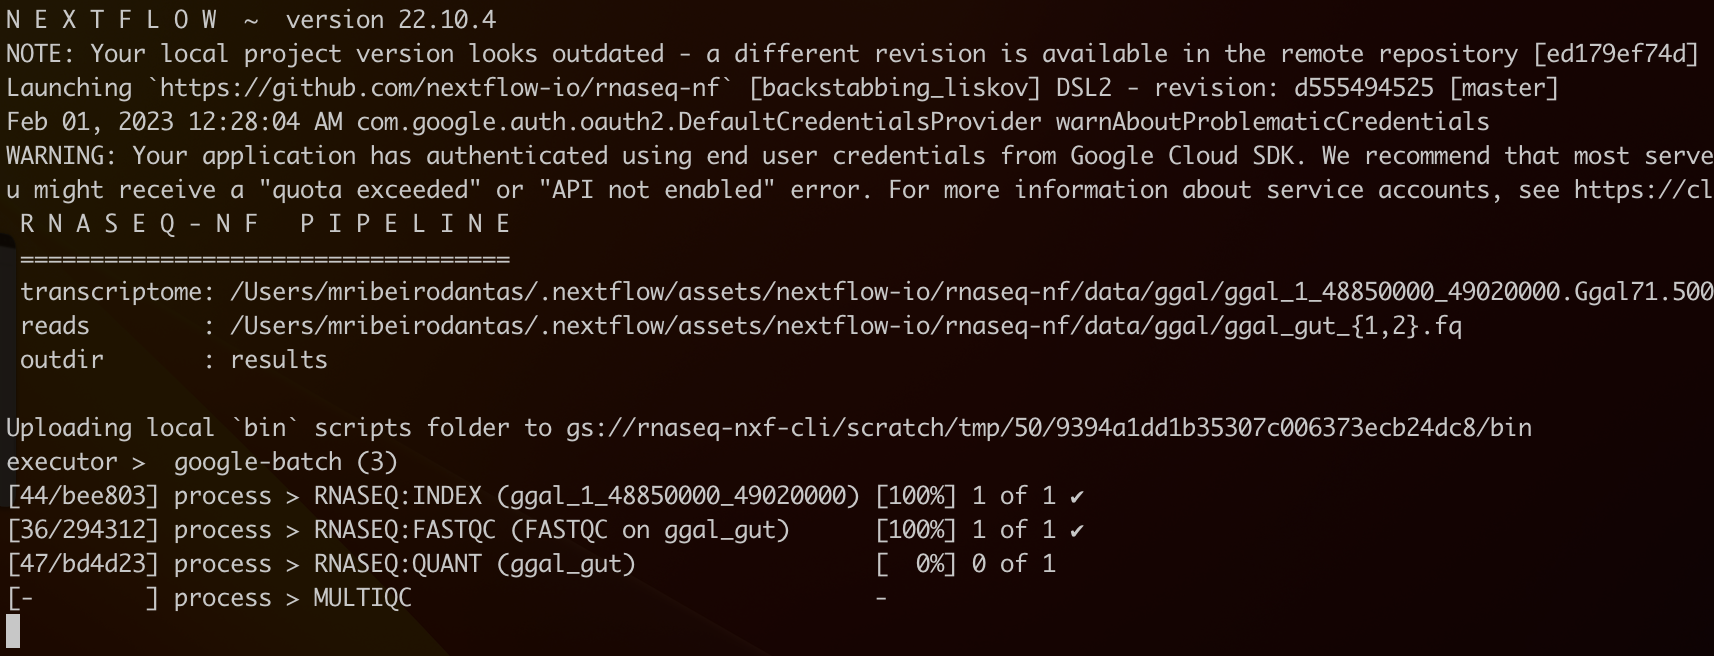
In your terminal, you should see something like this:
You can check the status of your jobs on Google Batch by opening another terminal and running the following command:
$ gcloud batch jobs list
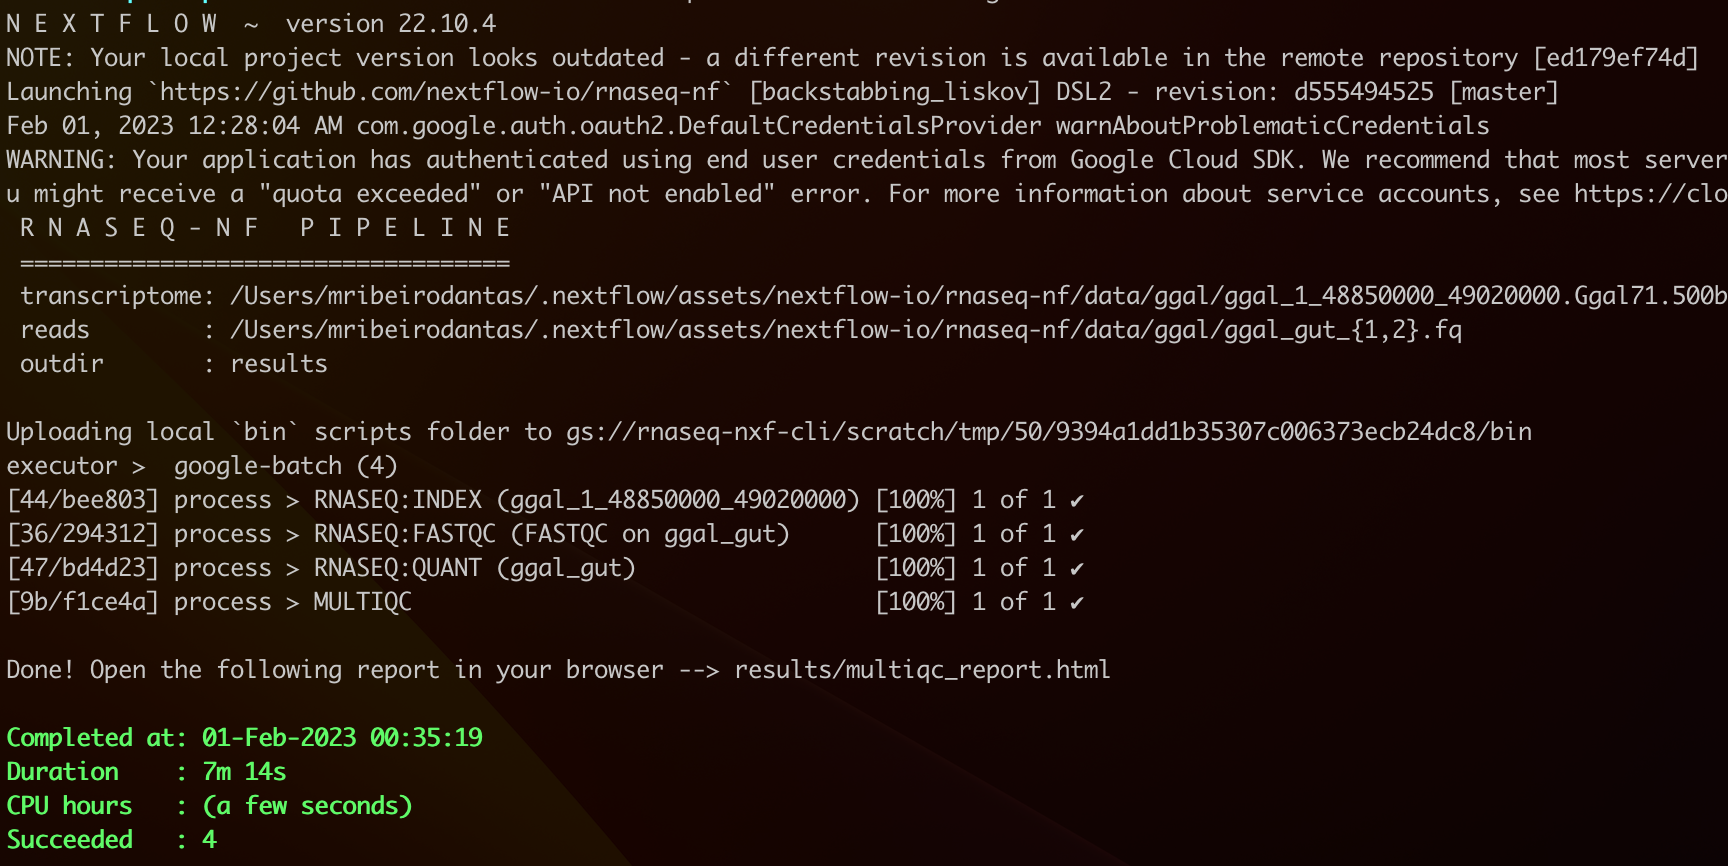
By the end of it, if everything worked well, you should see something like:
And that’s all, folks! 😆
You will find more information about Nextflow on Google Batch in this blog post and the official Nextflow documentation.
Special thanks to Hatem Nawar, Chris Hakkaart, and Ben Sherman for providing valuable feedback to this document.